Thursday, August 24, 2017

Persian Cucumber Update


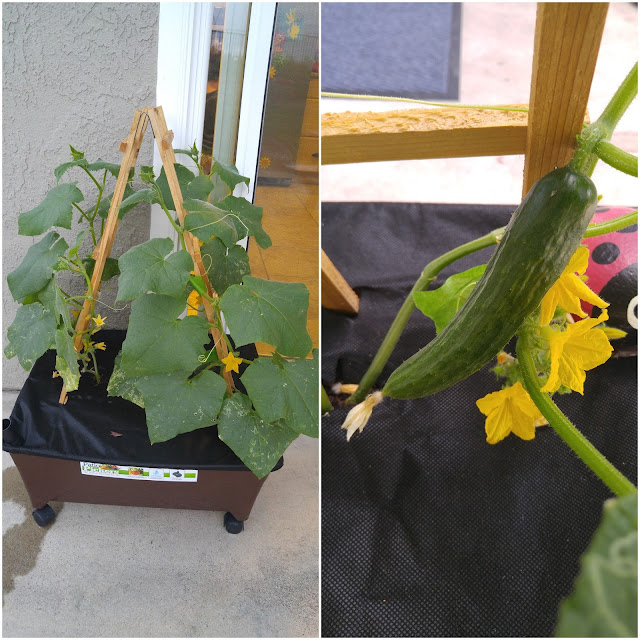
This was my first trying using the Earth Box and so far so good. These cucumbers have done far better than my Japanese variety I planted in the ground. I have about 8 tiny cucumbers, the largest one (pictured above) will be ready to pick in next week I believe. They are much happier and growing much faster than my previous attempt.

I believe the main difference to be the sun. My garden in the ground gets full sun pretty much all day and the cucumbers would wilt midday. The peppers and tomatoes seem to enjoy all that sun but the cucumbers are just too delicate.My earth box cucumbers are under our pergola so they are shaded throughout the day but also get plenty sun.

I did buy neem oil once I saw the signs of leaf miners. Most of the bad leaves towards the bottom I removed, some remain as you can see from the picture. All the new fresh leaves on top came out huge, dark green, and very happy.  That was until lately I started to notice some holes on the leaves. Started about 5 days ago and upon closer inspection I realized I had a green caterpillar issue. I manually removed all the ones I found and that put a halt to the holes however every morning there are more (super tiny freshly hatched) underneath the leaves. I have been smashing them because they're just too tiny to remove. I seem to be catching them before they do any real damage but it is exhausting to look for the little guys every single morning. I am pondering buying an organic caterpillar poison to spray on the leaves, They are obviously hatching from eggs I am not seeing. I keep blowing off little eggs I do see but I can't keep up.

Have to think of a better solution. This container currently holds 4 plants, you can see the one on the right towards the front (gets the most sun) is doing best out of the four.


Sunday, July 23, 2017

Creeper (Aptenia cordifolia)

Aptenia Cordifolia May 23, 2017
I don't have any original picture of this fun succulent creeper Aptenia Cordifolia when it was in it's pot. But back in it's hay day, this plant was in a pot and it would overgrow the sides and spill out. I would trim it back every winter, and it would start doing the same thing by spring. It was glorious.

This was of course back in our condo, we had an upper balcony that had sun almost all day but mostly afternoon/evening at peak hours of the day. I couldn't really grow flowers as I couldn't keep up with the amount of watering they were requiring. So I went all succulent to make it a little easier on myself. Which is how I found this guy.

I purchased it along with a bunch of other succulents the year we moved into the condo summer 2013 and have been it's keeper ever since. It did not do well in the move to Mission Viejo however, it was forgotten about a lot and unfortunately shrank down to nothing and was on the verge of death, it looked pretty pathetic. I decided since we had so much land available now, I'd put this little guy into the ground, fertilize, and see how it does.

So two months ago I placed it in a nice open area behind our mini water fountain. My hope was that it would eventually not only recover, but creep all over this open space back here and bloom it's pretty hot pink flowers. It has been two months and I am very pleased to see this little plant on the mend. Although it has not expanded it's territory much yet, it did recover it's lost foliage and is blooming (always a good sign). Will check back in after few more months and see how it's doing!


Aptenia Cordifolia July 23, 2017 (after 2 months)


Tuesday, July 11, 2017

My First Trip to Green Thumb Nursery

Through an OC gardening Facebook group I heard really good things about Green Thumb Nursery in Lake Forest. My husband and I have been on the lookout for an avocado tree (a very specific variety) so I thought I'd head over and take a look.

Green Thumb Nursery, Lake Forest, California.
It's a wonderland of magical healthy plants and gardens (and waterfalls which my 3 year old loved). It was terribly hot, I could have stayed for over an hour or more for sure but with the sun and kids, I had to be as quick as possible. But it was OH SO FUN.

Though I did find many varieties of avocado trees I did not purchase one. Decided to think on it more and do a little more research. But I did not walk out of there empty-handed! This flower I'd never heard of, the tag read Anchusa, it was $2.99 and covered in bees! Since my cucumbers had been having a few issues with pollination (lost some fruit that yellowed and fell off). I thought this was worth it try near my garden so I bought two. It was super pretty purple. The best part is the bees, it always has bees on it. In fact they were following me around while I was trying to plant it!
Anchusa (July 3, 2017)

 Also awesome trip because I finally found Persian Cucumbers! Had I know they were here all along I would have never wasted my time planting Japanese Cucumbers. Now I bought these and I have no room in my ground in-ground garden so I decided I'd have to figure out a pot situation for them. I didn't need this many, but I had to buy the pack. I ended up using 2 plants (technically 4 as each pocket has 2 plants), I gave one set to a friend, and the rest to my newphew who has taken up an interest in gardening lately.

Persian Cucumbers (July 3, 2017)
Several weeks after this trip I ended up finally buying a Earth Brown planting box. It was based on a "wicking" watering system. Which is where the bottom tray of the box is filled with several inches of water that eventually soaked up into the top soil through the "wicking" process. So the only watering you do is filling it up from a tube off the side so there is always water available for the plants. I also bought a small ladder trellis. This all may be for nothing, not sure if this will work or not but I am excited to try.

Earth Box Trial - Persian Cucumbers (July 11, 2017)

Wednesday, June 21, 2017

Fruiting! But also...unhappy?

It's pretty amazing to see tiny baby bell pepper appear. it's so dang cute. My cherry tomatoes are
Red Bell Pepper forming (June 21, 2017)
doing awesome (as expected),  those are so easy to grow though so it's not that special. My Fresno pepper has started a tiny baby and I couldn't be happier. I haven't seen any serrano peppers yet but it has a lot of buds. Also no cucumbers yet, again quite a few flowers.

Baby Fresno Pepper! (June 21, 2017)
My only complaint is they don't seem very happy. Their colors are all off (except for the cherry tomatoes). They seem yellowish in color and I am not quite sure what to do about it. The fresno pepper and serrano are growing taller despite this yellow color, but the bell pepper plant (even though it has 1 fruit growing) isn't getting any taller. The cucumber is climbing the new trellis my Mom helped me make, but it has the worst color of them all.

No cucumbers yet, but unfortunately have some leaf miners :(

My Mom says they may need more nutrients, which is crazy to me because the fresh soil I put them in should still be enough. But, maybe not. As a precaution I decided to fertilize again and hope they turn around color-wise.

All of them are yellowing except for the cherry tomatoes on the far right. I added the stake/twine trellis for the cucumbers to climb this week. Also bought a tomato cage. (June 21, 2017)


Sunday, May 21, 2017

The Mini Veggie Garden

I know it's too late in the season to plant seeds, so we decided to plant a small garden and pick up some already grown plants from Lowes. We wanted to just do around 4-5 plants so we picked ones we use in cooking. We decided on the following:

- Cherry Tomatoes 
- Fresno Peppers (my Father-In-Law uses these peppers in his famous hot sauce)
- Serrano Peppers 
- Bell Peppers 
- Persian Cucumbers Japanese Cucumbers

We couldn't find any Persian Cucumbers at Lowes or Home Depot, so we settled on Japanese Cucumbers. Once the plants were purchased Hubby spent the day digging out the spot on the side of the house we decided to start our wee garden.

This spot was chosen as my kitchen window overlooks it and it was really the only empty area of the backyard.
We bought little stone dividers to section off the spot to dig out. My husband spent over an hour digging out the dirt from this tiny spot. It was heavily compacted and apparently (from old photos of the house) previous owners had a huge bougainvillea bush along this wall. The remnants of the old root system was still in the soil and was quite an ordeal to dig out. We basically mixed almost all new soil with probably only 20% of the original dirt mixed in. I wanted to make sure the veggies had a good start.

Now here is where I could have done a better job. Since I was a kid my parents would always have a mini veggie garden in the backyard. They never used compost or fertilizers. Maybe we just happened to have very fertile soil, I don't know. But I automatically just assumed planting into fresh new soil was enough. Hindsight, I would have looked into mixing some like worm casings or other organic matter into the soil. But, we learn constantly! So I went ahead and planted everything a decent space apart. Then mulched. Again, we learn so much after the fact. I would not have used the mulch we already had (that was used around our flowers and trees) which is dyed. I would have chosen an organic mulch instead.
The mulch was pushed up to the stems after this pic was taken when I did my first water.
Pictured left to right: Japanese Cucumbers, Red Bell Peppers, Serrano Peppers, Fresno Peppers, Cherry Tomatoes.

As it turned out, there was a screw already in the wall directly above the garden, so we hung my Mayan Calendar decor (seemed appropriate for a garden).

Things I would change for next year:
  1. Grow your own veggies from seeds, begin at the proper season
  2. Mix your fertilizer/organic matter into your soil before planting
  3. Cucumbers are best grown vertically, plan for a trellis
  4. Stake your peppers for support early when their small (to avoid destroying any roots)
  5. Cage your tomatoes
  6. Use organic (un-dyed) mulch

Friday, May 12, 2017

We Need to Discuss The Lemon Tree.

Before I really get going documenting all my gardening adventures. I really feel it's necessary to discuss the Meyer Lemon Tree in the front of the house. I am not even 100% sure it's a Meyer, that was just my Mom's best guess. We didn't even own the house yet at the time (we were still in escrow), my Mom came on inspection day and pointed it out to me.

Our Meyer Lemon Tree (approx. 4' tall 4' wide) March 2017.
"Oh what a shame, this lemon tree is dying." 

"That's a lemon tree?!" I replied, shocked and also pleased.

"Yeah, looks like maybe a Meyer Lemon? I'm not sure. But it doesn't look very happy here, might be a bad place for it. May even be diseased."

I start examining the leaves, "Oh yeah *sigh*...you're right, doesn't look good. What a bummer."

The tree is placed in partial sunny and shaded walk way up to the front door of the house. It's easily something you can miss as it's nestled between big beautiful red geraniums, a large healthy rosemary bush, and big tall wall of what I think are African Fern Pines. The lemon tree is small, with some scraggly dead empty branches, the branches that did have leaves had only yellow and discolored leaves. Many of them mangled or diseased looking. The picture here is from the day of the inspection, it was a still shot from a video hubby took so the quality isn't so great. It is also hard to tell, but the leaves are actually very yellow. This picture makes them seem greener than they were.

I did some research on lemon tree care. A lot of research...like...A LOT. I watched video after video and read up and what could cause yellowing, too much water? Too little? Poor nutrients? I came to the conclusion it must be that this tree just had never been fertilized since it was planted. So I bought some quick dissolving Citrus fertilizer. Now, the reasoning behind the quick dissolve is that I was impatient to help this tree. I figured I would fertilize every 2-3 weeks (per instructions) until the bag was done and then move onto a slow release so I wouldn't have to fertilize so often. I picked up Jobes Organics Fruit and Citrus Fertilizer. I sprinkled it that day, April 23, 2017.

Also discovered Lemon Trees really love being mulched, so even though this area had been mulched before most of it looked several years old and had all dried out so I decided to re-mulch the area. I also pruned it back and cut dead branches to help it focus on it's health. Lastly, I read amazing things about Epsom Salts for basically ALL plants. Especially ones that might be low in magnesium which can also cause yellowing in leaves. I decided what can it hurt at this point to try? I bought basic Epsom Salts off Amazon. I followed instructions for how much to dissolve from reputable gardening sites. I used a 2gal sprinkling watering can and poured enough all over the leaves and enough to slightly soak the ground.

For the next few weeks I was incredibly impatient. I checked on this tree every morning (and sometimes evenings). I made it a fun activity for the kids and I to do. We started calling it our "garden walk". I put Mina in a little pink car with push handle and Z would get on his scooter and we'd start in the backyard checking all the plants, pulling weeds, pruning, etc. Then we'd make our way to the front and I'd check the lemon tree. I began to see positive results I'd say after a month. New growth began to appear and then finally after about 2 months this little guy appeared. I missed the blossom, so one day BOOM there was a tiny baby lemon. I was beyond excited!

My first lemon appeared after 2 months!


Here is a shot of the tree after couple months fertlized. You can see brighter green leaves started growing near the tips if branches. May 2017.


Sunday, April 23, 2017

Hello Mission Viejo!

So around the first week of April 2017 we were finishing up our move to our new home in Mission Viejo, California. We left our 2 bedroom condo in Rancho Santa Margarita (CA) for some much needed space and another room for Miss Mina who was now 7 months old.

It was hectic moving with a 3 year old and 7 month old but we managed it and were so happy to finally settle in. One thing seemed to loom over me though...the yard. I've never had such a huge backyard in my life and my first fear was that we'd ruin all the beautiful landscaping previous owners had done. We decided to immediately hire on the gardeners they were originally using (much to my husband's chagrin) and kept up with the original timed sprinkler schedule. We just decided it best not to change anything until we got a handle on the basic maintenance of it all.

After a few weeks of the grass not dying, it was Mother's Day, and we decided it was time. My Mom came to visit and helped us think about where we should start and what to plant.

First thing in the ground ended up being a Mother's Day gift to me from my Mom. Nana wanted to gift a rose bush for each grand kid. We went to Lowes and let Z pick out which one he liked best, he chose a Bright Yellow Henry Fonda Hybrid Tea Rose. For my daughter we picked one of the brightest velvetly looking red Olympiad Rose. It suited sweet Mina.

So big thanks to my Mom (AKA Nana) for helping us plant our first official contribution to the new house!